MakerLab has three different types of heat presses: automatic mug presses (2), an automatic mug and tumbler press, and an automatic clamshell press.
Automatic Tumbler Press
Best for mugs as well as straight tumblers up to 30oz.
- With the heat press unlocked and plugged in, turn on the switch located on the side.
- Press OK use the arrows to switch between C and F.
- Press OK to set the desired temperature as labelled 'SV'. Use the arrow keys to raise or lower the desired temperature.
- Press OK to set the time. This will be labelled "SV on the right. Use arrow keys to set the desired time.
- Press OK to enter real time mode. Note that "PV" is short for present value.
- The counter on the bottom right shows the number of transfer cycles. It ranges from 0 - 999. Press reset for 5 seconds to make the counter to go to 0.
Diagram of buttons and instructions
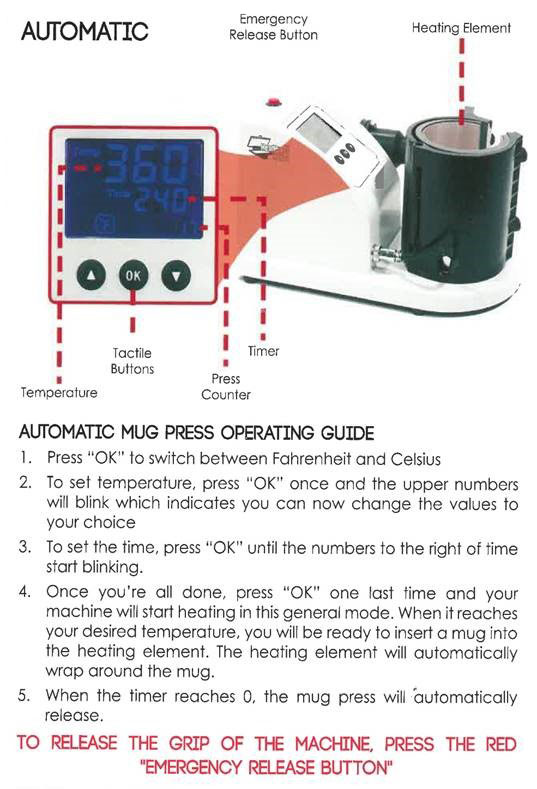
Automatic Mug Press
Best for 11oz mugs
- With the heat press unlocked and plugged in, turn on the switch located in the back.
- Press OK to switch between F and C.
- To set temperature, press OK once and the upper numbers will blink to indicate you can now change the values by using the up or down arrows.
- To set the time, press OK until the numbers to the right of Time start blinking. Time is measured in seconds.
- Once you're all done, press OK one last time and your machine will start heating. When it reaches your desired temperature, you will be ready to insert a mug into the heating element.
- When the mug is placed, the heating element will automatically wrap around the mug.
- When the timer reaches 0, the mug press will automatically release. Carefully take our your mug and let it cool.
The red button at the top of the machine is an emergency release button.
Diagram of buttons and instructions
Automatic Clamshell Press
Best for flat materials such as fabric.
- With the heat press unlocked and plugged in, turn on the switch located on the side.
- Press OK to switch between F and C.
- Press OK to set the desired temperature as labelled 'SV'. Use the arrow keys to raise or lower the desired temperature.
- Press OK to set the time. This will be labelled "SV on the right. Use arrow keys to set the desired time.
- Press OK to enter real time mode. Note that "PV" is short for present value.
- The counter on the bottom right shows the number of transfer cycles. It ranges from 0 - 999. Press reset for 5 seconds to make the counter to go to 0.
The red button on the side of the machine is an emergency release button.
Recommended Settings
Heat Transfer Vinyl (HTV)
Temperature and pressure across brands may differ slightly. Below are the recommendations from a few of the most common heat transfer vinyl suppliers.
Silhouette materials - heat press
Sublimation
Each material is slightly different, so if the manufacturer provides instructions, please follow the manufacturer's settings.
Visit the settings from the print manufacturer if you do not have other instructions. These can be used as a good starting point in absence of other instructions.